

by marinersfan59
Website Version
This tutorial requires the following programs:
-Any image editing program
-Buggy's Ridemaker
-Dr. J's Object Editor (1.22 or 1.23)
-humble_programmer's DATchecker (optional, but helpful)
-pos generator (again, optional, but helpful if needed)
Step 1: Set Up
Make a folder to do the work in (your working directory), and copy a footpath from the game directory into this folder. I chose the original green tarmac footpath from the game, and I will make it into a version with diagonal corners. If you need an easy way to find certain paths and view images of them, try Datchecker by humble_programmer.

Step 2: Getting the bmp images from the path.
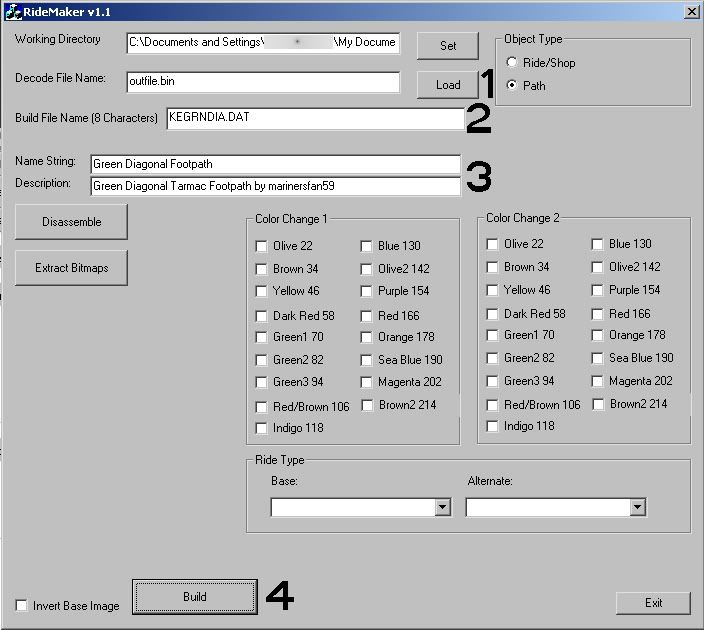
For this we use Buggy's Ridemaker (click to download) application. Here's what we do here:
1: Buggy's Ridemaker can handle Rides/Shops and Paths. Select Path.
2: Click Set, and find the file that you just copied into your working directory. This will select your folder you created to put the images in.
3: Click Load, and pick the *.DAT file you just selected. This loads the file in order to edit it.
4: Click Disassemble and wait until an alert says finished, then press OK, this uncompresses the file.
5: Click Extract Bitmaps, this further uncompresses the files, and makes the object so it can be edited.
Click for Image
Step 3: The images
So now there are a lot of images with the bmp extension in your working directory. If not, you did something wrong. Delete all files except the DAT file and restart from step 2. The number of images will vary amongst the different types of paths. Here's the breakdown of what image is what:
000-050 - The normal paths that are used to get around the park
051-070 - Queue line paths (do not put the railigns on in these images)
071 - Preview normal path (two pieces connected, one with supports, one without)
072 - Preview queue path (two pieces connected, one with supports, one without)
073-078 - Railings for flat path pieces
079-082 - Railings for sloped pieces
083-086 - Railings for inside corners
087-092 - Railings for flat queue pieces
093-096 - Railings for sloped queue pieces
097-100 - Railings for inside corners queue pieces
101-108 - Scrolling queue entrance sign
The rest of the imagse are images used for supports, and will vary depending on what type of path you choose as your base. You may choose to edit some of these or leave them how they are, but they will not be covered in this tutorial.
IMPORTANT: The following images are 1x1 pixels, and PURE black (0,0,0 or #000000)
058, 062, 064, 065, 066, 109
I don't know why these are like that or what they are, and most likely you don't either, so just leave them alone.
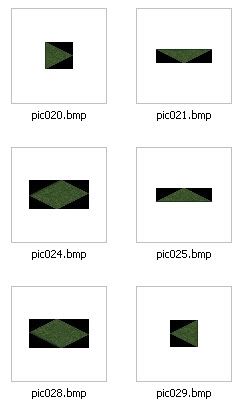
If you would like to make the path a diagonal path (as I am doing in this tutorial), edit the following images:
020, 021, 025, 029 in these directions:
Step 4: Reassembling
Back into Buggy's Ridemaker we go! Follow these 3 simple steps:
1: Load the outfile.bin file from your working directory, and if you don't have it selected already, choose Path in the "Object Type" box.
2: Enter a file name for the object (8 letters/numbers or less) including the ".DAT" exetension.
3: Enter the in-game info for the ride (Title/Description)
4: Hit the Build button and click OK after the Finished alert. It should gather all of the info it needs and compile it into the filename you entered earlier.
Click to View Image
Step 5: Checking and finishing
So, you're almost there. Let's run this item through humble_programmer's DATchecker.
Downloads:
Win XP (version 1.5)
NT/2000 version
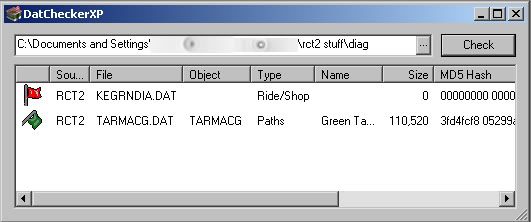
What's this? The DAT file we just made shows a red flag? And shows as a Ride/Shop? And no filesize? Or MD5?
Relax, there's an easy fix. This is where Dr J's object creator comes in. Below are links to two versions of his editor. Some people (including me) run into errors with v1.23, so I use v1.22.
Downloads:
Version 1.22
Version 1.23
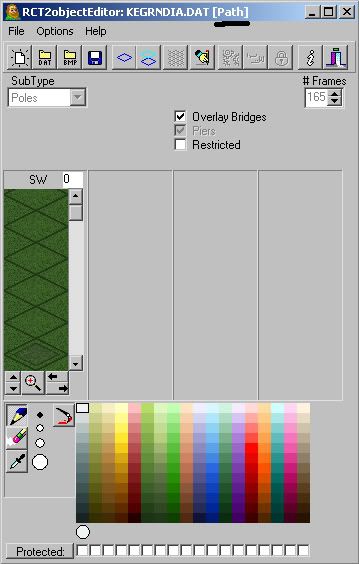
Now that you open your DAT file in this program, the 0th image will appear in the left (the first image), and notice that the program reads it as a path now? Just click Save and you're good to go. Let's see what DATchecker says now.
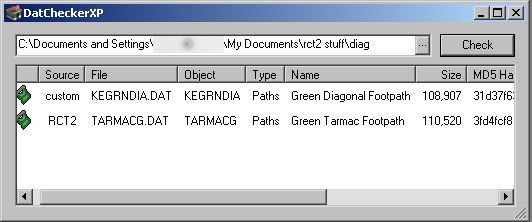
The green flag shows and our object is done (unless it may need some tweaking). Congratulations. Let's look at it in game.
If yours does not line up correctly, then you're pos.txt file is incorrect. You can use the pos Generator found here (made by Sash).
Downloads:
pos.txt Generator v2
Good luck in your object creating.


